
By Darren Stones
So what's a good way to slow down a photographer who madly dashes around with their camera snapping as many subjects as possible? Suggest to them that they use a tripod.
Compose images with a critical eye
Photography is an art form, and for those who are serious about wanting to improve their landscape photography, I highly recommend using a tripod.
One of the key benefits of using a tripod is that it slows the image making process whereby giving us time to analyse the scene and think creatively about it.
We should be mindful of how we compose our images because it is critical in the image making process to producing interesting looking photographs. And that's what we all seek to do.
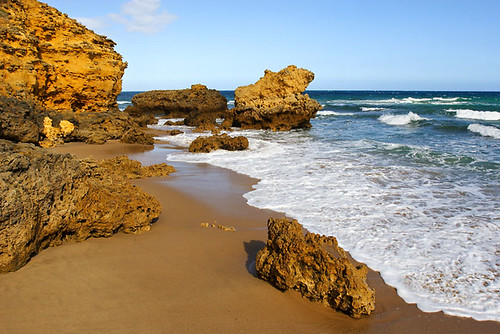
#1 - Rocky Point at Torquay
Canon 20D, Canon 17-40mm lens @ 17mm
1/640sec, f/11, ISO 200, Tripod, RAW
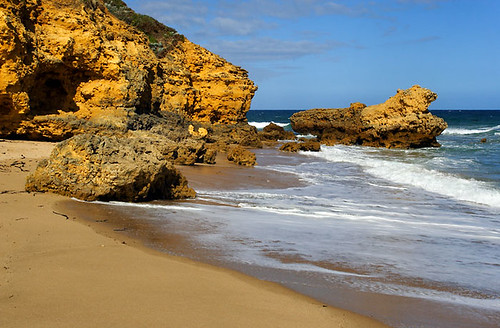
#2 - Rocky Point at Torquay
Canon 20D, Canon 17-40mm lens @ 30mm
1/250sec, f/13, ISO 200, Tripod, RAW
Experimenting with techniques
The Surf Coast area along the Great Ocean Road in Victoria is one of my favourite locations for photography. I believe the stretch from Point Danger at Torquay through to Jan Juc is perfect for experimenting with landscape photography techniques that require using a tripod.
Exposure settings
During the last few years I have taken a series of images in the same area at Rocky Point, Torquay. In making each image, I have mounted my camera on the tripod and photographed the scene using different exposure settings.
Create a collection
The reason I return to this location and photograph it, is that I can create a collection of photographs that features the same area and produce different looking images. I do this by using various camera and composition techniques, and by using my tripod.
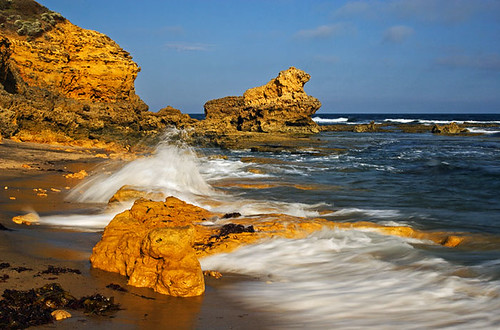
#3 - Rocky Point at Torquay
Canon 20D, Canon 17-40mm lens @ 30mm
1/25sec, f/13, ISO 100
B+W 64x Neutral Density Filter
Photoshop adjustments include:
Levels, Brightness and Contrast selections and masking,
Gradient Fill Layer selection and masking
B+W 64x Neutral Density Filter
Photoshop adjustments include:
Levels, Brightness and Contrast selections and masking,
Gradient Fill Layer selection and masking
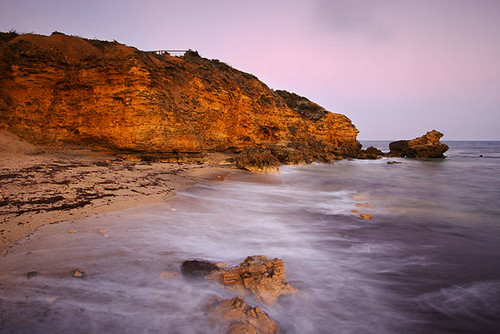
#4 - Rocky Point at Torquay
Canon 20D, Canon 10-22mm lens @ 14mm
5sec, f/14, ISO 100, Tripod, RAW
Lee 0.9 (3 stops) Soft Neutral Density Graduated Filter
Photoshop adjustments include:
Levels, Brightness and Contrast selections and masking, Saturation
Levels, Brightness and Contrast selections and masking, Saturation
Freezing and blurring water movement
Freezing and blurring water movement are creative techniques that require different shutter speeds. Longer shutter speeds allow us to produce images that blur the movement of water, whereas faster shutters speeds freeze the water movement.
In image #1 and #2, I have chosen to freeze the movement of the water. My objective in these images was to create leading lines in the wet sand and water, whilst also emphasising the jagged rocks and the fine weather.
Using a neutral density filter
During the day in sunny conditions, it can be difficult to slow the shutter speed and blurring the movement of water. However, with the use of a neutral density filter, it can be achieved.
For image #3, I used a B+W brand 64x Neutral Density Filter. This filter reduces the exposure by 6 stops and it allowed me to slow the shutter speed to 1/25sec. As you can see in the image, I have created movement in the water and it's particularly noticeable where the wave hits the rock.
Time, analysis and creativity
So in summary, use a tripod when photographing your landscape scenes and give yourself time to analyse the scene. Develop your creative skills and you will create better landscape photographs.
No comments:
Post a Comment
Hi and thanks for visiting.
Please post your comment or ask a question in relation to this article.
Darren Stones